Saturday, February 27, 2016

Another 96 Chevy story.

Those of you that read this blog have probably figure out that I don't buy new vehicles. I buy used and spend far less working on them myself. Ya..you guessed it,here's another 96 Chevy story cause the truck went up on blocks again. Its been a long time coming and I figured once my daughter's Firebird sold I would get to the truck. Well the car's gone and I finally got the chance to get under the truck and have a look.

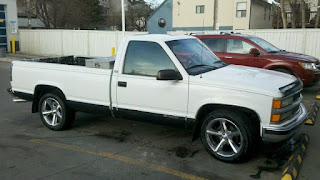
My 96 Chevy Truck
 This is a picture I took a couple years back after a trip to the car wash.

 Up on Blocks

 Well, so far the truck has over 450,000 klicks one it (297000 miles). The interior looks pretty good and for the most part the truck's body seams ok, from a distance. I've been grinding out small rust patches here and there and just spraying Rock Guard over it the keep the look. And that's worked very well. I jack it up,put it on up on blocks and have a look underneath to find the pan gasket leaks all the way around, the power steering pressure line leaks when it connects to the steering box, the passenger side header leaks and a whole assortment of other minor issues. So, I decide to make a list of things that need to be done and a few that I've wanted to do for a while. So inside of about 30 minutes, my list was compiled and I started pulling the grill and lower air damn,signal light lenses and so forth.

In the back of my mind,I've always wanted to black out the grill and change the appearance of the front of the truck. The of course I decided I want to pretty much change the appearance of the whole truck. Prioritizing though leaves me at,stopping the rust and repairing the other little things first and foremost. I've noticed small rust spots starting all over the truck and after any mechanical issues those will be my priority. And,as any gear head knows,once you bust one or two things open you'll always find something else you want to change or modify. That being said, I know I'm off on another adventure.

 The Front Grill 
96 chevy truck gril

As you can see,the front grill has a few miles on it. Years of winter driving,gravel roads and car washes have taken their toll. You can't see from the picture but, there is a few small cracks on the plastic joints that are easy enough to fix with some glue.


96 Chevy Reflector lense

Now, when you're stripping the front grill be careful. This Chevy has 450,000 clicks on it so some parts are gonna be a little worn. This reflector lense was already repaired before I bought the truck 10 years ago. The plastic studs break fairly easy so maybe hit them with a shot of lube or WD-40 before taking them apart.

96 Chevy Truck Grill clean

You can always buy a good stripped to remove the flaking chrome finish. I decided that I wanted to spend an hour or so with a gas powered pressure washer that kicks out about 2600 p.s.i. Cleaned'er up right nicely.


Matte Black Chevy Grill


The grill turned out pretty good in spite of a few blemishes. I didn't bother to fill any of them simply because this was just a quick fix job. This truck is due for a full ground up rebuild soon so I just wanted to change the look a bit for the summer.



Sunday, February 21, 2016

Installing an Amplifier

Deciding on an Amp

Let's have a look at installing an amplifier or what most of us simply call an Amp. If you are planning on operating a sub or two with mid-range and tweeters then you'll need a couple amps. There are a number of different types, some use one to power subs alone,some use multiple amps to power their systems. Some amps have built in crossovers that can cross over different frequencies that are dedicated to a certain speaker. some amps are dedicated to a full range signal,such as a set up for 3 way speakers. Big subwoofers sound the best playing in 100 Hz and lower. How much power your amp needs depends on how many speakers you plan on driving with it,it should be able to put out 1.5 to 2 times the power continuously as the lowest power speaker that is hooked up to it. You want amp that has enough power for your speakers so :clipping does not become an issue. This is where the sound wave squares off and the top and bottom of the sound wave gets clipped off. The whole idea is to get maximum performance and years of enjoyment from your system. For now lets just look at the basic set up.


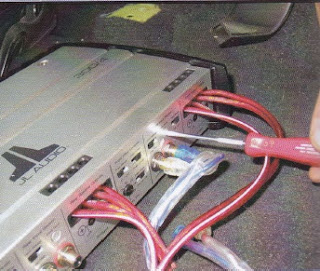
basic amp


If you want thump,the only way to get it is with a quality amplifier. Tip #1,don't cover your amp,it needs cooling! And make sure the amp is mounted solid.


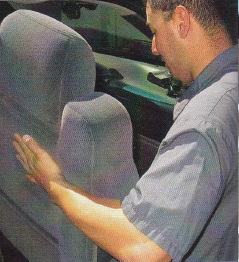
taking out the front seats.


Usually mounting your amp under the front seat works the best for cooling as there is plenty of air circulating under there. This is where most amp manufacturer's recommend mounting. It also gives you an opportunity to do a thorough cleaning job underneath.


running power for your amp


A little planning will save a lot of grief when you're running your power supply for your amp. Securely mount where ever you need to. This will insure trouble free operation of your amp because you'll know your power is properly tended to.


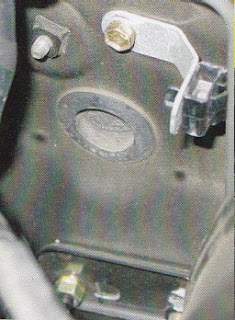
Rubber grommet in firewall


When ever possible use an existing hole in the firewall to run your amps power though into the passenger compartment. This saves time knowing that there is clearance behind this part of the firewall.


Wiring harness


Every modern stereo head unit has what's called a remote signal control wire. This is the wire that tells your amp to turn on. Originally this wire was designated as a power antenna wire and can be used for either application even in this day and age.


properly ground wire


Be sure to use a suitable ground for your amp. Using either a wire brush or a small piece of sand paper so that you have true metal to metal contact. after the ground is secure,hit it with a quick blast of spray paint to seal it and prevent any type of rust from forming. Rust makes a lousy ground.


running wires


Make sure you read the instructions very carefully when it comes to the wiring. Many,many problems have come from seemingly slight mistakes. Knowing what the instructions say can prevent hard earned money from going down the tubes..yes,speaking from experience. Be sure to note what color RCA is coming from what channel from the head unit. double check all connections before powering up any amp.


Making adjustments for the best sound


Now that your installation is complete,follow the manufacturer's instructions and adjust settings for the best sound.


Pictures are from Haynes Xtreme Customizing Manual,knowledge and text are my own and will not be removed

Installing new speakers in your Chevy Truck

Ok, lets get something straight. Factory speakers get the job done, barely. After you install a new deck it will only be a matter of time before you're installing new speakers in your Chevy truck. Factory speakers are cheap for the most part and they're pretty much done after a few years simply because the paper cones just fall apart. A quality set of speakers is a matter of choice, I personally use an Alpine system. 

 Crimp Connectors

Lets go over a couple tips first. Some will solder their connections and some will use crimp connectors these include spade or bullet connectors. I prefer to use crimp connectors. If something goes wrong with a speaker or component then its a simple matter of unplugging the male connector from the female. Here's a piece of advice,have the female connector crimped to the lead power wire when ever possible. If the wires come disconnected at any time the power wire is shielded from grounding out. Be sure to use the right connector for the gauge of wire you are using. Most quality crimping tools have the gauges marked on them. 
22-18 gauge wire = Red connectors
16-14 gauge wire = Blue connectors
12-10 gauge wire = Yellow connectors

Speaker Installation

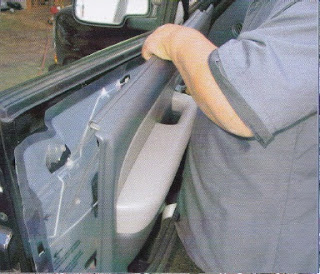
Taking the door panel off 

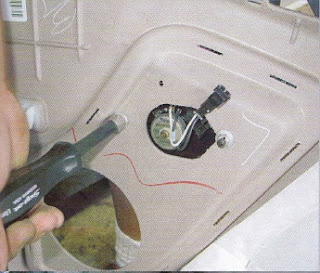
 Removing the door panel is a simple matter of removing the bezel around the interior door handle,removing the screw then gently popping off the small panel that houses the power window switch and removing the screw there as well. You will have to feed the panel with the switches through the panel as you gently lift straight up on the panel then away from the mounting holes. once you have the panel a couple inches away from the door,reach in and disconnect the wires from the tweeter mounted in the door panel.


Removing tweeter retaining nuts.


Now that the door panel is off you'll notice the tabs that are bent over in the slots seen in the picture. Bend the tabs straight and remove the screen. This is a very good time to clean and even paint the screen if you want. Now, don't worry about saving the nuts for the plastic tweeter mounts,as soon as you start loosening them off generally one,the other or both will break. You're going to want to be careful with the plastic face as you will need to trace out the shape for your new tweeter mount.


Fabricating a new tweeter mount


Using the tweeter, trace it out on a template as shown on an1/8 inch piece of paneling. Use a jig saw or a coping saw to gently cut the template out.


Drilling out the hole for the tweeter


Using a drill mounted keyhole saw that matches the size of the tweeter,cut out the hole for the tweeter. Use a bit of caution doing this as it does not take much to over do it. Although not shown by this picture it's very easy to warp or distort the shape of the template by tightening the vice too much. I did not have to do this step as I was able to mount my tweeters directly to the template with screws.


Gluing template to the door panel


Now glue the template as shown in the picture,this step was first as you would need to drying time for the glue. I used PL400 floor glue for this step. Any type construction glue or hot glue will do the trick. Remember a little goes a long way so be as neat as possible so save cleaning up a nasty mess later...yes, speaking from experience.


Taking out the old door speakers


Removing the factory door speakers is a very simple matter. Remove the 4 mounting screws and out she comes. 1996-99 Chevy trucks have speakers that clip in so you will have to use screws to mount the new speakers. Hang onto these speakers as you never know if you are going to sell the new system with the truck should you decide on that.


new wires from the crossover


Now is the best time to feed new wire through the door and rubber boot. Its a simple matter to run the new wire through the door pillar and under interior trim pieces to where the crossovers or amps are mounted. The old speaker connectors are pretty much exclusive to factory speakers and will be all but, useless for the new application. Be sure to re-install the boot and run the wires nice and clean through any trim panels for a neat finish.


Attaching new wires


You can either solder the new wires to the speakers or use spade connectors. My preference is the spade connectors because it makes it easy to swap out speakers and components. Be sure to give a little extra wire for the tweeters as well.


Installation of new speakers


Installing the new speakers is as easy as it looks,4 screws and they're in.


connecting the crossover


Mount the crossover close to the amp for easy of wiring. It makes things nice and neat to have all your wires going to and from the same place. Be sure to feed wires under the carpet or inside interior trim panels where ever possible to help protect the wiring. Give yourself enough wire to do a nice job. Being frustrated not having enough can be very stressful.


Pictures are courtesy of the Haynes Xtreme Customizing Manual. Knowledge and text are my own and will not under any circumstances be removed

Installing a New Stereo in your Chevy

So you 're wanting to install a new stereo in your Chevy. When I put a stereo in my 01 Chevy the first thing I noticed was how similar it was to installing one in my 96 Chevy truck. Let's start with the head unit, they say a fish rots from the head down so if you start with a decent head unit your system will be off and running. First things first, prior to pulling things apart do a bit of research and make sure you have the proper adapter bezel,connectors wire and so on. Remember all those times when I mentioned getting a service manual for your vehicle? Well this is one of those times you should have it just reference. Make sure you have disconnected the battery to be sure you don't accidently catch an airbag in the face.

Removing trim around the dashRemoving the dash trim is actually easier than it looks. Slowly use your fingers to pull back on the trim, you'll need to have the tilt wheel all the way down and the truck in neutral so make sure either your foot is on the brake,the emergency brakes are on or the wheels are blocked. Most Chevy trucks from 1996 to about 2011-12 are pretty close to the same when it comes to removal. Anything older and you're reaching up from the bottom of the dash or custom making a mounting console to accommodate a Din deck. Anything newer refer to your service manual


Head Unit removal

Once you have the dash trim removed you'll see a tab on each side of the stereo,press these down and carefully slide the deck out. Remember,the factory buttons can and usually will pull off so having a box right handy to put the stereo in is a good idea,be sure that its big enough to have the old speakers put in as well.


removing wiring harnes


When you remove the wiring harness,be sure to gently press down on the plastic retaining tab on the top of the plug. It may only be plastic but,it will seem as if it's crazy glued in until it breaks if you fail to press down on the tab.


soldering connections


There are a couple ways to attach the new wires to the trucks stereo wiring harness. I used an adapter plug and crimp connectors with heat shrink to do the trick. Some, like shown in the picture will solder the connections.


attaching the stereo sleeve to adapter


Slide the stereo sleeve through the adapter bezel from the front until it is tight and bent the closest tabs over to the outside of the sleeve.


New stereo,sleeve and bezel


Yup, you guessed it, the new stereo slides right into the sleeve. It may seem a little tight so use care when sliding the head unit in.


New harness and RCA plugs


Be sure to have the new harness and RCA plugs installed and you're ready to slide the new deck into the slots.


new stereo sliding into place


You'll hear a click as the mounting clips seat into place. Use a bit of caution so that none of the wires from the harness or the RCA plugs get jammed up while you're sliding the head unit in.


Carefully re-install the dash trim in reverse of how you removed it checking to make sure the mounting clips are going back into the places they are meant to. I have messed this step up and let me tell you,its not fun listening to it rattle while you're driving down the road. When complete it will look likes it was meant to look like this from the factory.
Credit goes to the Haynes Xtreme Customizing Manual for the pictures.