Ok, lets get something straight. Factory speakers get the job done, barely. After you install a new deck it will only be a matter of time before you're installing new speakers in your Chevy truck. Factory speakers are cheap for the most part and they're pretty much done after a few years simply because the paper cones just fall apart. A quality set of speakers is a matter of choice, I personally use an Alpine system.
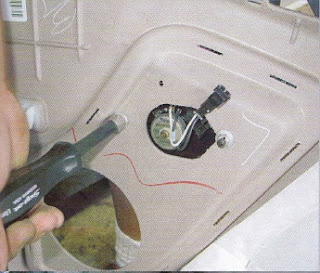
Now that the door panel is off you'll notice the tabs that are bent over in the slots seen in the picture. Bend the tabs straight and remove the screen. This is a very good time to clean and even paint the screen if you want. Now, don't worry about saving the nuts for the plastic tweeter mounts,as soon as you start loosening them off generally one,the other or both will break. You're going to want to be careful with the plastic face as you will need to trace out the shape for your new tweeter mount.
Using the tweeter, trace it out on a template as shown on an1/8 inch piece of paneling. Use a jig saw or a coping saw to gently cut the template out.
Crimp Connectors
Lets go over a couple tips first. Some will solder their connections and some will use crimp connectors these include spade or bullet connectors. I prefer to use crimp connectors. If something goes wrong with a speaker or component then its a simple matter of unplugging the male connector from the female. Here's a piece of advice,have the female connector crimped to the lead power wire when ever possible. If the wires come disconnected at any time the power wire is shielded from grounding out. Be sure to use the right connector for the gauge of wire you are using. Most quality crimping tools have the gauges marked on them.
22-18 gauge wire = Red connectors
16-14 gauge wire = Blue connectors
12-10 gauge wire = Yellow connectors
Speaker Installation
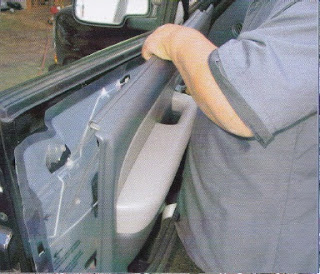
Removing the door panel is a simple matter of removing the bezel around the interior door handle,removing the screw then gently popping off the small panel that houses the power window switch and removing the screw there as well. You will have to feed the panel with the switches through the panel as you gently lift straight up on the panel then away from the mounting holes. once you have the panel a couple inches away from the door,reach in and disconnect the wires from the tweeter mounted in the door panel.
Now that the door panel is off you'll notice the tabs that are bent over in the slots seen in the picture. Bend the tabs straight and remove the screen. This is a very good time to clean and even paint the screen if you want. Now, don't worry about saving the nuts for the plastic tweeter mounts,as soon as you start loosening them off generally one,the other or both will break. You're going to want to be careful with the plastic face as you will need to trace out the shape for your new tweeter mount.
Using the tweeter, trace it out on a template as shown on an1/8 inch piece of paneling. Use a jig saw or a coping saw to gently cut the template out.
Using a drill mounted keyhole saw that matches the size of the tweeter,cut out the hole for the tweeter. Use a bit of caution doing this as it does not take much to over do it. Although not shown by this picture it's very easy to warp or distort the shape of the template by tightening the vice too much. I did not have to do this step as I was able to mount my tweeters directly to the template with screws.
Now glue the template as shown in the picture,this step was first as you would need to drying time for the glue. I used PL400 floor glue for this step. Any type construction glue or hot glue will do the trick. Remember a little goes a long way so be as neat as possible so save cleaning up a nasty mess later...yes, speaking from experience.
Removing the factory door speakers is a very simple matter. Remove the 4 mounting screws and out she comes. 1996-99 Chevy trucks have speakers that clip in so you will have to use screws to mount the new speakers. Hang onto these speakers as you never know if you are going to sell the new system with the truck should you decide on that.
Now is the best time to feed new wire through the door and rubber boot. Its a simple matter to run the new wire through the door pillar and under interior trim pieces to where the crossovers or amps are mounted. The old speaker connectors are pretty much exclusive to factory speakers and will be all but, useless for the new application. Be sure to re-install the boot and run the wires nice and clean through any trim panels for a neat finish.
You can either solder the new wires to the speakers or use spade connectors. My preference is the spade connectors because it makes it easy to swap out speakers and components. Be sure to give a little extra wire for the tweeters as well.
Installing the new speakers is as easy as it looks,4 screws and they're in.
Mount the crossover close to the amp for easy of wiring. It makes things nice and neat to have all your wires going to and from the same place. Be sure to feed wires under the carpet or inside interior trim panels where ever possible to help protect the wiring. Give yourself enough wire to do a nice job. Being frustrated not having enough can be very stressful.
Pictures are courtesy of the Haynes Xtreme Customizing Manual. Knowledge and text are my own and will not under any circumstances be removed


No comments:
Post a Comment