Friday, February 12, 2016

Adding a little Safety to your garage.

If you`re anything like me,it may have taking you a while to add a little safety to your garage,
I always thought that I was being pretty smart when I worked on my vehicles,looking back though..maybe not so much.
I`ve gotten Anti-freeze in my eyes, accidently started a fire using an electric fuel pump, dropped a couple heavy objects due to using the wrong type of chains...well you get the picture. so here`s a few things to think about prior to starting any kind of work on a vehicle or pretty much doing anything in the garage for that matter.

  1.  Don't count on a jack,always use jack stands that are rated for the weight of the vehicle.
  2. If you're loosening really tight lug nut,get them cracked before jacking the vehicle up.
  3. Properly block your vehicle from rolling when lifting one end or the other.
  4. Don't be taking of the rad cap when the engine is hot. Same goes for draining oil,even though they never let the engine cool down when you go into a Minute Lube,that doesn't mean its safe to do.
  5. When your working on your brakes,stay well away from the cancer causing agents that make up part of your brake pad and shoe linings. This goes for clutch discs too! Here's a hint of one of the products,Asbestos!
  6. When using a wrench,always try to pull towards you. Unless it is open enough on the opposite side to push the tool without you scraping or cutting your knuckles.
  7. Use the right tool for the job.
  8. Use proper drain pans that will hold as much fluid as you need them too when you are draining them.
  9. Use safety glasses and hearing protection. Take it from a guy that's half deaf and had to flush his eyes out lots of times and has a hard time hearing what the wife is sayin.
  10. Label everything! Even if you are they only one that works in your shop. You never know when your kid is going to think that old anit-freeze tastes like liqourice.
  11. If you have young children, make sure your paints and cleaners are in a cabinet they can't get into.
  12. Keep a bottle of peroxide in your shops first aid kit in case your family dog had a taste of that anti-freeze in the drain pan on the floor.( Small dog= 1 table spoon,medium and larger breeds 2 table spoons) Let them puke it out and then call a vet. (Don't do this with your kids call the hospital!)
  13. Get a buddy to help lift that 5 speed transmission onto the bench,or anything else that weighs more than you do. Once back issues start,they have a habit of coming with a lifetime guarantee! 
  14. We all know you`re smart enough to not have loose clothing on when it can get caught up in anything that spins fast..electirc fans,fan belts,alternators..and so forth.
  15. Never ever rush a job! Take the time to do whatever it is that you are doing right. The safe operation of your vehicle is priority number 1,if your vehicle is un-safe as a result of your work it effects everyone on the road with you. That includes the safety of your family.

Steering,Brakes and Your Front End.

 If you have never worked on any of these systems of your vehicle then find out all you can about them. Rule number one for me,the second thing I buy after I`ve bought a vehicle is to go down to the local parts store and buy the manual they sell for it. Having fasteners left over after you`ve installed new brake pads would tell you there`s something wrong. If you need one,click here. You may have to search a bit but,its well worth it.

Airbags

 These safety features on your vehicle are in essence explosive actuated devices. Make sure you`ve gotten all the info you need to properly dis-able your vehicles airbags while you are working on them,one of the reason`s why they recommend that you remove the negative battery cable from your battery prior to working on your vehicle is to prevent the airbag from punching you in the face at the wrong time.

Asbestos

Contrary to what most people think (and I say think cause the majority doesn`t know any better) every vehicle on the road has cancer causing asbestos integrated into various parts on a vehicle,disc and drum brakes, clutches just to name a few. Use a mask when working on these parts and avoid the dust!

Fire Prevention

Remember that I mentioned fire before? Well let me tell you, a gasoline fed fire spreads very fast! I blew through 2 30 pound fire extinguishers putting out a fire I started by not using my head. At the very least one Dry Chemical fire extinguisher at each entryway into the garage or one very handy if you are in the driveway.
Remember, any device that uses radio frequencies,cell phones,2 way radios and the like, create static electricity and can cause a fire under the right conditions. If you have gas in a container with no lid on it then vapors are present. I watched a guy set fire to his work truck on morning when he was talking on his phone. There's a reason that sign means "NO Cell Phones". Anything that can cause a spark can start a fire if there's vapors present.

Fumes

There's a reason that cleaning product come with what's called an MSDS or Materials Safety Data Sheet. These wonders of modern technology tell us some very important information when it comes to proper use. Reactions, LEL (lower explosive limit), UEL (upper explosive limit) and proper handling techniques just to name a few. These products sometimes create toxic fumes. Make sure you wear the proper masks and have ventilation when required when you use these products.

If you use a little due diligence your project will turn out exactly how it was supposed to and you'll get to live to tell about it. I've seen natural selection come into play through out the years and its never pretty. At the very least,make sure your first aid kit is up to date and is adequately stocked.



GM & Chevy Truck History Lesson


Chevy Truck Origins

If you were lucky enough to be around in 1918 you could have picked up the very first Chevy truck that rolled off the line. If not,then here's a bit of a Chevy truck history lesson. The very first truck featured 22 horsepower.The truck was nothing special with no cab and a sticker price of $600.00.The truck came without a cab but,either the cab or the bed could have been installed by an aftermarket company,which is what a lot of people did. This was also the same year that Chevrolet was to become a part of GM.

Up until 1928 GM was mostly building commercial trucks,then they decided to change that and brought out the new T-11 pick-up.Based on the Pontiac truck with 36 horsepower,this truck was to be the first in a long line of great pick-ups from Chevy that many,many people would base their build ups on.Or just have a truck that would haul what they needed around the farm.


Beautiful Chevy show truck


The new advanced 6 cylinder OHV engine was build and introduced in 1929.This engine was considered powerful for it's time and was actually very efficient given the technology available during the time.

Major and minor technological advances through out the 30's and 40's saw horsepower gains,more comfort,bigger trucks.Then came 1955,Gm and Chevrolet started taking ideas from their cars.The styling started to take on a look that really started to make the GM and Chevy trucks stand out.Power options from the reliable 6-cylinder to the newly available V-8 that featured 154 to a 155 horsepower.The Chevy used the stout Small Block for their trucks while GM used the slightly larger Pontiac V-8 until 1960.The Small Block Chevy made such a good platform that it soldiered on the power most of the GM vehicles until 1998.

1957 saw the new 4 wheel drive introduced and the Chevy truck was the most popular truck in the U.S. Although GMC trucks were every bit as good.In 1960 Both GM and Chevy trucks were produced with a major face lift that included the new "pinched" look running the length of the truck.

Now,bare in mind that history being what it is,there is some conflicting versions about engine use and production through out the long celebrated history of the Chevy truck.The 283 was a great little engine that was pretty much bullet proof.The 327 featured almost the perfect rod/stroke ratio for and acceleration engine was available in the Chevy truck in 1966 with 220 horsepower.

A couple of things to remember,the "C" designation means two wheel drive. The "K" designation is for the four wheel drives. The Number 10,for half ton trucks,20 three quarter ton and 30 for 1 ton trucks.Today the numbers 1500,2500 and 3500 are used.

My favorite Chevy truck was built from 1967 -72. As far as I'm concerned these were the best looking Chevy truck made. The 1988-1998 style is a close second. The styling of the 67-72 trucks were a complete change from previous years and is the starting point of many build ups today. I'm not going to go into the available engines and when they came out due to the many different versions of the truth about what was put into what.

Engine displacement and horsepower ranged from the 175 horsepower 283 to the 255 horsepower 327.the 195 horsepower 307 was also used for a couple years but, was not reliable enough to be considered a good build-up starting point. The 310 horsepower 396 was also and option in 1970. However, the was also the odd truck with the 283 horsepower 283,375 horsepower 327 which by the way would beat a 375 horsepower 396 due to the weight factor and then the 375 horsepower 396.1967 marked the last year of production for the 283.1969 was the last year for the 327.These engines were still installed from the factory until 1970 for the 283 and 1972 for the 327 because of left over complete assemblies.In 1970,the 396 was replaced by the small block 400.Although this engine came out with 250 horsepower,it made a lot of torque.

In 1973 horsepower ratings were down across the board because of the new "SAE Net" rating system and lower compression ratios.And we all know that people sometimes have a heavy foot and like to use the power they have under the hood. Building pressure from insurance companies also had a major part in the horsepower going down.

The Small Block Chevy was set at 305 and 350 C.I.D. and the Big Block was set at 454 C.I.D for the next twenty years. The 250 and 292-6 cylinder was still available but,were completely replaced by the 4.3 liter V-6 in 1988,which is basically a small block Chevy with the front two cylinders cut off.

GM introduced a 5.7 liter diesel based on the Oldsmobile engine in 1978 and replaced it with the 6.2 liter in 1981 that provided more power and better fuel economy.

1998

In 1998 Chevy and GMC came out with a new generation of trucks. Better power and fuel economy combined with great styling that in my mind reminded my of the 67-72 model years.Electronic fuel injection and 700R 4 speed automatic transmissions greatly helped the efficiency of these trucks.Although,the 5-speed stick shift was the best combination for fuel economy.A powerful new diesel was introduced in 1992,this became one of the most powerful engines for towing and hauling to date.In 1996 was saw the Vortec put into the trucks with sequential fuel injection in the small blocks and multi-port on the 454. However,I will always be a fan of the first EFI installed on the Chevy's in 1987.

In 1999 we saw the introduction of the 4.8,5.3, and 6.0 liter engines the were a marvel of engineering and efficiency. The 5.3 liter actually displaces 323 cubic inches and not 327. A flatted torque curve and higher horsepower made these engines great for reliability.The 8.1 liter turbo diesel came along in 2001 with 300 horsepower and 500 lb/ft of torque causing some people to start towing and hauling work that used to require a bigger truck.

Now don't for a minute think that GM and Chevy have not continued their refinement of their line up of trucks.With the economic crunch and demands for better fuel economy.they have their work cut out for them but,if history is any indicator they will come out on top of the pack just like they have so many times in the past.The GMC and Chevrolet trucks have consistently have the highest re-sale value,most economical and most dependable trucks on the road for at least the last 30 years that I can remember. And they are built right here in North America!
We're not sure whom to credit for this info and therefore we are just sharing it with the general public.

305 Engine Myths

305 Chevy Small Block

I have owned a few 305 engines and I have a little knowledge when it comes to them. Debuting in 1976 the 305 was to be the small block that carried Chevy into the eighties. With more and more constraints placed on the automotive industry to meet government mandated EPA standards an engine had to be produced that would be the replacement for the 350 CID. With a smaller bore and less aggressive cam profile these engines were basically designed to just get the job done. The 305 has a 3.48" stroke and a bore of 3.75",not 3.87" that the 283 has as some will tell you. The smaller bore restricts the size of the intake valve that can be installed on that engine. The 305 also has a dished piston.
  I was looking at a third Gen Firebird to build and I came across one sitting in a yard just off the hi-way one day. I went into the yard and found the owner and started talking to him about the car and had a good look at it. The interior was completely shot and it would need a little body work. After talking with the owner and finding out that the car had a "high performance 305" I was a little taken back. Now,I'm going to be honest with you. No matter what you do with a naturally aspirated 305,you will never see more than 325 horsepower out of a 305 that is naturally aspirated and that is with a lot of work done to it. The cylinder walls do not have enough metal in them to make boring them worth the time. The block just wasn't designed with that in mind. Remember that the engine itself was designed to meet emissions standards. Anyway,the price that I offered for the car was about 2000 less than what the owner wanted for it. I offered to take the engine out and return it to the gentleman as further talk revealed that it had been driven about 150 miles after the motor was rebuilt and then parked and had not been fired it 10 years. The owner insisted that everything was fine and that the engine was "top notch". It became painfully clear that this was going to be something I would have to pass up and I did.


   Now,one of the things you can do with a 305 is install a bigger cam than you could into a stock 350. The reason for this is the dished pistons. You will however need to install valve springs that can handle the increase in valve lift,yes I'm talking from experience here. Taking into consideration that engine have the highest vacuum at idle says that the velocity of the air charge going into the chamber is very good at the low end. You get better velocity flowing 200 cfm of air through 180 cc runners then if you had 210 cfm of air going through 200 cc intake runners. With that said,you can create some good low end power with a 305 and a decent camshaft. A good set of headers and exhaust system coupled with a good after market intake manifold and carb set up also helps. Basically all the things you would already do with 350 Chevy aside from installing 2.02"  heads. The largest valve you can install on a 305 is 1.84" without hitting the cylinder walls. If you want the most you can get,hogging out the exhaust runners will also help. As I said before,the most power you can reasonably expect is around 310 - 325 horsepower.

Forced Induction

  If you plan on any type of forced induction,then a Turbo would be the way I would go. The reason for this is simple,given the limited valve size it makes sense. You would be creating more low end velocity through the intake runners. A supercharger will of course increase horsepower but,it would also increase the thrust load on the bottom end bearings more than a Turbo charger. It just wouldn't be as efficient as a turbo. Remember if you do plan on rebuilding a 305 it might be an idea to balance the internals and think about a complete roller valve train. It's just freeing up a little more horsepower. There are also a lot of guys out there that can do some amazing stuff with a set of heads so it would pay to do your research.


  The research and development that went into the 305 lead to some serious improvements to the technology that went into the small block chevy. Making a lot of the horsepower improvements implemented into the 350 in the 80's and the return of big horsepower. In 1991 the TPI 305 was for all intents and purposes just a fast as the TPI 350.

Tuesday, February 09, 2016

The C-10 Pick-ups

More and more I find myself thinking about building a C-10 Pick Up. I've owned a few over the years and looking back I could kick myself for letting them go. There's a lot of truth to "You don't know whatcha got till it's gone".
A good friend of mine bought a 1970 4x4 Pick Up about the same time I bought my Camaro. I have to admit,he got a fantastic deal on this truck. He's my expert on this style of pick up.
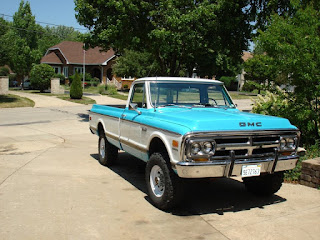
1970 GMC 4x4

I first fell in love with this style of Chevy when I was 16 years old. A lady pulled into the gas station I was working at and I just started drooling. After asking if I could check it out and get a real good look at it I was hooked. It would be a couple years till I actually owned one for myself though. I remember putting a steering wheel from a 76 Trans Am in it. Buck seats. I put a 350 from a fire damaged 70 Chevy short box in the truck and as far as I was concerned I was good to go!
Lowered 67 GMC Pick Up
This 67 is a pic I came across somewhere out there on the net. I love the lowered look and the 20 inch wheels. While some may say this look takes all the class out of this Chevy, I appreciate the time and effort people put into building any hot rod project.
Here's the same style of pick up without being lowered. They both look great. You can't deny that the old C-10's are one of the best trucks that came off the assembly line. I've even seen a 69 Chevy 4x4 with a box from a 89 Chevy Step side on it and it looked like that's how it rolled out the assembly plants doors. 


Monday, February 08, 2016

The New 350 in the Camaro

A little while ago I decided to have a serious look at the motor in my 1980 Camaro. I had tried to work a few of the bugs out of it with no luck. You see,I bought this car from a friend of mine from my old home town. I took him at his word that things were built properly. Big mistake on my part but,that story's for another time.

  After swapping the 750 Edelbrock Performer for a 650 of the same make and a little tuning the car sounded pretty good,just have a listen to the video.
 

 Thing is,when I took it out on the street,it was a dog. My 96 Chevy Pick Up could lay waste to it. And now matter what I did I always had a bit of an erratic idle quality. I only had 4-5 inches of vacuum  showing on the gauge so I got to thinking that there may have been a mistake when the cam timing was set up. There was a gear drive timing gear set up installed. Or maybe that the valve lash wasn't adjusted properly. I had guide plates and screw in studs so I knew I was going to have problem setting my valve lash with the intake manifold in place. So I decided to have a serious look at the internals. So a buddy and I started to pull a few things apart. That's when I knew there was problems with this engine.

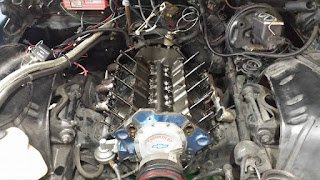
Old 350 in the Camaro
Old 350 short block

Note the Harmonic balancer, looks a lot like it was hammered on, never a good thing to see! Generally when that's happened you end up with more crankshaft end play then you want. The screw in studs were nice to see however, the finger tight nuts gave me further cause for concern. When I got to this point, I was still hoping to be able to salvage the engine and not have to remove the short block. Then I noticed that the block had 6 matching piston bosses. The last two were from a different set of pistons. The cylinder heads were ported out to the point that the porting had cut into the hold down screw holes for the valve covers.
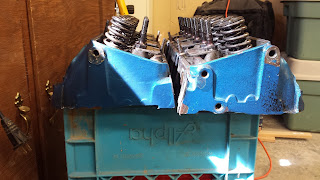
Casting number 3991492 SBC Heads
These heads were a 3991492 casting number. And yes, they were angle plug small chamber Camel back heads. The porting job completely ruined some of the best factory heads that ever came out the back door of the Racing Shop in Detroit.

  I had and engine from my daughter's S-15 that would serve until I could find a suitable replacement for the long run. I also had a set of aluminum Vortec cylinder heads that would do a fine job in the Camaro. So I set to pulling the old heads off the replacement 350. I was in for a suprise. Stamped right on the top of the flat top forged pistons the resting inside the cylinder of my daughter's engine was .020. Meaning that the engine had been bored out. The cross hatch in the cylinders was still excellent. I pulled the pan off the bottom of the motor to find forged rods. When I pulled the heads off I also noted that there was no carbon build up at all. And the motor did run very strong in my daughter's truck.

  So after a gasket kit,installing the Vortec heads,adjusting the valve lash prior to a new Edelbrock intake the motor was ready to go in. The heads are 2.02 Patriot Aluminum Vortec's with 188 CC runners. The did have both old school and the new Vortec intake bolt patterns however, I installed a proper Edelbrock Aluminum intake manifold because I had sealing issues with the old style bolt pattern with these cylinder heads.
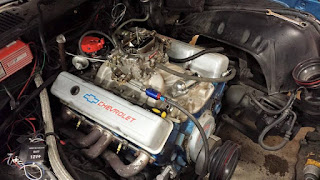
New 350 Chevy
The new 350 looks really good inside that Camaro!

After bolting the carb, water pump and the rest of the accessories up the small block was ready to fire up.
Here's what it sounds like,
 

All in all a good result and I'm very happy with it.


Chevy Truck Hubs

I've had my share of problems with trucks,generally not with my Chevy's front hubs. I was on my way home with a stop in town before hitting the house. It had been a fairly long day and I was looking forward to relaxing. As I turned at the intersection that lead from the highway to the small town I lived outside of I noticed my front end start a hell of a wobble! Thinking back I wish I had gotten a picture of what it looked like on the side of the highway. For now though, a pic of what it looked like after I got the wheel off will have to do for ya.

My work truck's broken wheel studs

After stopping at the first approach I came to, I pulled the cape off the rim to discover that I had three broken wheel studs. So,first thing I did was jack up the truck, then I grabbed my cordless impact and tightened what was left of my nuts. Now my hands were getting a little cold because it was Febuary and the temp was dropping quick cause the sun had just gone down. Knowing now that my plan for the night had changed I stopped at the push and pull store and grabbed a 6 and headed for home.

   Once home I pulled the truck into the shop and pulled out the brand new hubs I had gotten with the truck a couple years ago when I bought it. Finding them in perfect shape after inspection I started pulling wheels off the front of my work truck. Once on jack stands with the wheels off I noticed why the holes are in the plate where the studs are pressed into, they give access to the bolts that hold the hub assembly onto the front axle. The general assembly is pretty much the same across the board with most of the American built trucks. And to be honest,to this day Chevy Truck parts are the cheapest in the aftermarket. and they are the easiest to work on. after disconnecting the speed sensor plug, removing the bolts that bolt to the axle housing and removing the big wheel nut in the center my hub was ready to come off. Now here's where I always wonder if it would pull of nice of be a serious investment of my time. I was lucky enough to be able to wrestle both front hubs off with no problems. Now,straight up when you change one hub then change the other. Unless there is absolutely no other option. New parts operate like new parts,using one old and one new when there's more then one is generally asking for problems. For example..wiper blades,tires, spark plugs, front wheel hubs...well you get the picture.

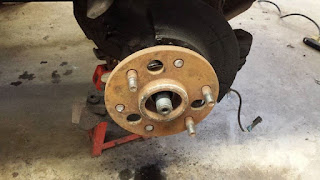
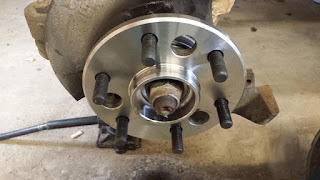
  So after about an hour I had both the old hubs off and one new one installed, and this is what it looked like.
Work trucks new hubs

Everything looks nice and shiny right out of the box. Installation does require Axle grease along the spindle shaft and for good measure pack along any bearing surface as well. These new hubs had sealed bearings pressed into them so I greased what ever surface I felt needed grease. I didn't tighten the retaining bolts to what they where at, I torqued them to 90 lbs with some lock-tight on the threads and snugged the spindle nut (the big nut the holds the hub to the spindle shaft) to 12 inch pounds. Now, here's how you do that. first you snug the nut up till the hub bearing seats onto the spindle,then you back it off and snug it up again till there's a little drag. This is how I was taught how to do it and I haven't had any problems as a result. However there may be many different way to make this happen. After about two hours total time in the garage,I had the truck back together and ready for work the next morning. Of course a buddy stopped by and laughed at me tellin me better me then him and yada yada..lol.