Saturday, March 19, 2016

Whatever Happened to AJGeneral.com

 What happened to AJGeneral.com

There are a lot of people that wondered whatever happened to AJGeneral.com. The site was my baby. I built it to sell restoration and performance parts. I decided to create a site that gave it's customers a better experience based on knowledge gained from first hand experience dealing with high performance and the restoration of classic muscle cars that came out of the 60's and 70's. I personally handled every email,phone call and request. I wrote articles for the site and even found technical information such as casting numbers for old school engines. I worked on AJGeneral in all of my spare time. Eventually I made a full time living from the website. I researched hard to find parts for people and was straight up about issues that other companies would B.S. about. If a part wasn't available I would say so,I wouldn't take a customers money and hope for the beast feeding them a line if they didn't get their order in time. I would spend countless hours chasing down parts for people across North America so that they could make their hot rodding or restoration dream come to life. I noticed something else along the way,soon all the other premier websites and companies like mine were following what I was doing, I have to say that sure made me smile!

One Fateful Day.

One fateful day I got a notice from my websites hosting company. My hosting fee payment was made out to Bright Builders and not eSilverBullet, the company that bought my hosting company. Before I knew it,I no longer had access to my website or any of my admin. I was locked out. By the time I found out my domain name had already been sold. The person that bought the domain name wanted a huge amount of money for it. I was very clear that the domain was useless to him as I owned the copyrights to AJGeneral. 

Moving Forward.

I was able to rescue all the tech info I had posted on AJGeneral thanks to a very good friend of mine and have it all posted on this blog. I have just started rebuilding a store on the site for those of you that are interested in parts for your project and I am in the process of posting more information based on experience from myself and others that submit it to me. The new store can be seen just to the right side of the blog articles and I will continue to bring the most up to date information I have on both the small block and big block Chevrolet. I will also be bringing myself and the site up to snuff on articles about the LS Chevy's as well. So while I'm in the process of doing so,I thank all of you that were loyal to AJGeneral and hope you can bare with me as I continue on with JWT Automotive.

Saturday, February 27, 2016

Another 96 Chevy story.

Those of you that read this blog have probably figure out that I don't buy new vehicles. I buy used and spend far less working on them myself. Ya..you guessed it,here's another 96 Chevy story cause the truck went up on blocks again. Its been a long time coming and I figured once my daughter's Firebird sold I would get to the truck. Well the car's gone and I finally got the chance to get under the truck and have a look.

My 96 Chevy Truck
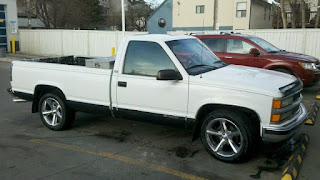
 This is a picture I took a couple years back after a trip to the car wash.

 Up on Blocks

 Well, so far the truck has over 450,000 klicks one it (297000 miles). The interior looks pretty good and for the most part the truck's body seams ok, from a distance. I've been grinding out small rust patches here and there and just spraying Rock Guard over it the keep the look. And that's worked very well. I jack it up,put it on up on blocks and have a look underneath to find the pan gasket leaks all the way around, the power steering pressure line leaks when it connects to the steering box, the passenger side header leaks and a whole assortment of other minor issues. So, I decide to make a list of things that need to be done and a few that I've wanted to do for a while. So inside of about 30 minutes, my list was compiled and I started pulling the grill and lower air damn,signal light lenses and so forth.

In the back of my mind,I've always wanted to black out the grill and change the appearance of the front of the truck. The of course I decided I want to pretty much change the appearance of the whole truck. Prioritizing though leaves me at,stopping the rust and repairing the other little things first and foremost. I've noticed small rust spots starting all over the truck and after any mechanical issues those will be my priority. And,as any gear head knows,once you bust one or two things open you'll always find something else you want to change or modify. That being said, I know I'm off on another adventure.

 The Front Grill 
96 chevy truck gril

As you can see,the front grill has a few miles on it. Years of winter driving,gravel roads and car washes have taken their toll. You can't see from the picture but, there is a few small cracks on the plastic joints that are easy enough to fix with some glue.


96 Chevy Reflector lense

Now, when you're stripping the front grill be careful. This Chevy has 450,000 clicks on it so some parts are gonna be a little worn. This reflector lense was already repaired before I bought the truck 10 years ago. The plastic studs break fairly easy so maybe hit them with a shot of lube or WD-40 before taking them apart.

96 Chevy Truck Grill clean

You can always buy a good stripped to remove the flaking chrome finish. I decided that I wanted to spend an hour or so with a gas powered pressure washer that kicks out about 2600 p.s.i. Cleaned'er up right nicely.


Matte Black Chevy Grill


The grill turned out pretty good in spite of a few blemishes. I didn't bother to fill any of them simply because this was just a quick fix job. This truck is due for a full ground up rebuild soon so I just wanted to change the look a bit for the summer.


Sunday, February 21, 2016

Installing an Amplifier

Deciding on an Amp

Let's have a look at installing an amplifier or what most of us simply call an Amp. If you are planning on operating a sub or two with mid-range and tweeters then you'll need a couple amps. There are a number of different types, some use one to power subs alone,some use multiple amps to power their systems. Some amps have built in crossovers that can cross over different frequencies that are dedicated to a certain speaker. some amps are dedicated to a full range signal,such as a set up for 3 way speakers. Big subwoofers sound the best playing in 100 Hz and lower. How much power your amp needs depends on how many speakers you plan on driving with it,it should be able to put out 1.5 to 2 times the power continuously as the lowest power speaker that is hooked up to it. You want amp that has enough power for your speakers so :clipping does not become an issue. This is where the sound wave squares off and the top and bottom of the sound wave gets clipped off. The whole idea is to get maximum performance and years of enjoyment from your system. For now lets just look at the basic set up.


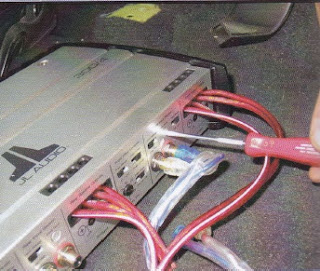
basic amp


If you want thump,the only way to get it is with a quality amplifier. Tip #1,don't cover your amp,it needs cooling! And make sure the amp is mounted solid.


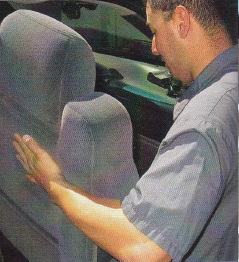
taking out the front seats.


Usually mounting your amp under the front seat works the best for cooling as there is plenty of air circulating under there. This is where most amp manufacturer's recommend mounting. It also gives you an opportunity to do a thorough cleaning job underneath.


running power for your amp


A little planning will save a lot of grief when you're running your power supply for your amp. Securely mount where ever you need to. This will insure trouble free operation of your amp because you'll know your power is properly tended to.


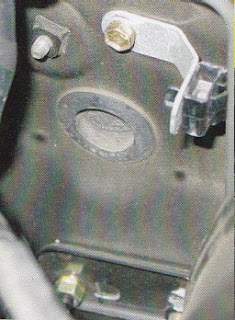
Rubber grommet in firewall


When ever possible use an existing hole in the firewall to run your amps power though into the passenger compartment. This saves time knowing that there is clearance behind this part of the firewall.


Wiring harness


Every modern stereo head unit has what's called a remote signal control wire. This is the wire that tells your amp to turn on. Originally this wire was designated as a power antenna wire and can be used for either application even in this day and age.


properly ground wire


Be sure to use a suitable ground for your amp. Using either a wire brush or a small piece of sand paper so that you have true metal to metal contact. after the ground is secure,hit it with a quick blast of spray paint to seal it and prevent any type of rust from forming. Rust makes a lousy ground.


running wires


Make sure you read the instructions very carefully when it comes to the wiring. Many,many problems have come from seemingly slight mistakes. Knowing what the instructions say can prevent hard earned money from going down the tubes..yes,speaking from experience. Be sure to note what color RCA is coming from what channel from the head unit. double check all connections before powering up any amp.


Making adjustments for the best sound


Now that your installation is complete,follow the manufacturer's instructions and adjust settings for the best sound.


Pictures are from Haynes Xtreme Customizing Manual,knowledge and text are my own and will not be removed

Installing new speakers in your Chevy Truck

Ok, lets get something straight. Factory speakers get the job done, barely. After you install a new deck it will only be a matter of time before you're installing new speakers in your Chevy truck. Factory speakers are cheap for the most part and they're pretty much done after a few years simply because the paper cones just fall apart. A quality set of speakers is a matter of choice, I personally use an Alpine system. 

 Crimp Connectors

Lets go over a couple tips first. Some will solder their connections and some will use crimp connectors these include spade or bullet connectors. I prefer to use crimp connectors. If something goes wrong with a speaker or component then its a simple matter of unplugging the male connector from the female. Here's a piece of advice,have the female connector crimped to the lead power wire when ever possible. If the wires come disconnected at any time the power wire is shielded from grounding out. Be sure to use the right connector for the gauge of wire you are using. Most quality crimping tools have the gauges marked on them. 
22-18 gauge wire = Red connectors
16-14 gauge wire = Blue connectors
12-10 gauge wire = Yellow connectors

Speaker Installation

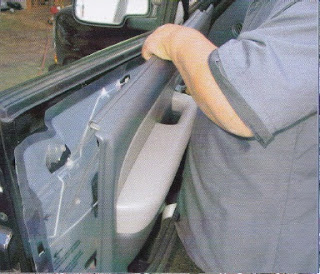
Taking the door panel off 

 Removing the door panel is a simple matter of removing the bezel around the interior door handle,removing the screw then gently popping off the small panel that houses the power window switch and removing the screw there as well. You will have to feed the panel with the switches through the panel as you gently lift straight up on the panel then away from the mounting holes. once you have the panel a couple inches away from the door,reach in and disconnect the wires from the tweeter mounted in the door panel.


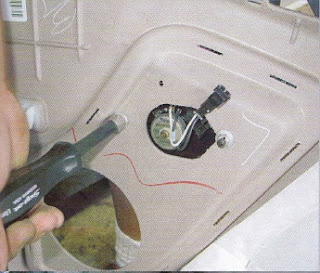
Removing tweeter retaining nuts.


Now that the door panel is off you'll notice the tabs that are bent over in the slots seen in the picture. Bend the tabs straight and remove the screen. This is a very good time to clean and even paint the screen if you want. Now, don't worry about saving the nuts for the plastic tweeter mounts,as soon as you start loosening them off generally one,the other or both will break. You're going to want to be careful with the plastic face as you will need to trace out the shape for your new tweeter mount.


Fabricating a new tweeter mount


Using the tweeter, trace it out on a template as shown on an1/8 inch piece of paneling. Use a jig saw or a coping saw to gently cut the template out.


Drilling out the hole for the tweeter


Using a drill mounted keyhole saw that matches the size of the tweeter,cut out the hole for the tweeter. Use a bit of caution doing this as it does not take much to over do it. Although not shown by this picture it's very easy to warp or distort the shape of the template by tightening the vice too much. I did not have to do this step as I was able to mount my tweeters directly to the template with screws.


Gluing template to the door panel


Now glue the template as shown in the picture,this step was first as you would need to drying time for the glue. I used PL400 floor glue for this step. Any type construction glue or hot glue will do the trick. Remember a little goes a long way so be as neat as possible so save cleaning up a nasty mess later...yes, speaking from experience.


Taking out the old door speakers


Removing the factory door speakers is a very simple matter. Remove the 4 mounting screws and out she comes. 1996-99 Chevy trucks have speakers that clip in so you will have to use screws to mount the new speakers. Hang onto these speakers as you never know if you are going to sell the new system with the truck should you decide on that.


new wires from the crossover


Now is the best time to feed new wire through the door and rubber boot. Its a simple matter to run the new wire through the door pillar and under interior trim pieces to where the crossovers or amps are mounted. The old speaker connectors are pretty much exclusive to factory speakers and will be all but, useless for the new application. Be sure to re-install the boot and run the wires nice and clean through any trim panels for a neat finish.


Attaching new wires


You can either solder the new wires to the speakers or use spade connectors. My preference is the spade connectors because it makes it easy to swap out speakers and components. Be sure to give a little extra wire for the tweeters as well.


Installation of new speakers


Installing the new speakers is as easy as it looks,4 screws and they're in.


connecting the crossover


Mount the crossover close to the amp for easy of wiring. It makes things nice and neat to have all your wires going to and from the same place. Be sure to feed wires under the carpet or inside interior trim panels where ever possible to help protect the wiring. Give yourself enough wire to do a nice job. Being frustrated not having enough can be very stressful.


Pictures are courtesy of the Haynes Xtreme Customizing Manual. Knowledge and text are my own and will not under any circumstances be removed

Installing a New Stereo in your Chevy

So you 're wanting to install a new stereo in your Chevy. When I put a stereo in my 01 Chevy the first thing I noticed was how similar it was to installing one in my 96 Chevy truck. Let's start with the head unit, they say a fish rots from the head down so if you start with a decent head unit your system will be off and running. First things first, prior to pulling things apart do a bit of research and make sure you have the proper adapter bezel,connectors wire and so on. Remember all those times when I mentioned getting a service manual for your vehicle? Well this is one of those times you should have it just reference. Make sure you have disconnected the battery to be sure you don't accidently catch an airbag in the face.

Removing trim around the dashRemoving the dash trim is actually easier than it looks. Slowly use your fingers to pull back on the trim, you'll need to have the tilt wheel all the way down and the truck in neutral so make sure either your foot is on the brake,the emergency brakes are on or the wheels are blocked. Most Chevy trucks from 1996 to about 2011-12 are pretty close to the same when it comes to removal. Anything older and you're reaching up from the bottom of the dash or custom making a mounting console to accommodate a Din deck. Anything newer refer to your service manual


Head Unit removal

Once you have the dash trim removed you'll see a tab on each side of the stereo,press these down and carefully slide the deck out. Remember,the factory buttons can and usually will pull off so having a box right handy to put the stereo in is a good idea,be sure that its big enough to have the old speakers put in as well.


removing wiring harnes


When you remove the wiring harness,be sure to gently press down on the plastic retaining tab on the top of the plug. It may only be plastic but,it will seem as if it's crazy glued in until it breaks if you fail to press down on the tab.


soldering connections


There are a couple ways to attach the new wires to the trucks stereo wiring harness. I used an adapter plug and crimp connectors with heat shrink to do the trick. Some, like shown in the picture will solder the connections.


attaching the stereo sleeve to adapter


Slide the stereo sleeve through the adapter bezel from the front until it is tight and bent the closest tabs over to the outside of the sleeve.


New stereo,sleeve and bezel


Yup, you guessed it, the new stereo slides right into the sleeve. It may seem a little tight so use care when sliding the head unit in.


New harness and RCA plugs


Be sure to have the new harness and RCA plugs installed and you're ready to slide the new deck into the slots.


new stereo sliding into place


You'll hear a click as the mounting clips seat into place. Use a bit of caution so that none of the wires from the harness or the RCA plugs get jammed up while you're sliding the head unit in.


Carefully re-install the dash trim in reverse of how you removed it checking to make sure the mounting clips are going back into the places they are meant to. I have messed this step up and let me tell you,its not fun listening to it rattle while you're driving down the road. When complete it will look likes it was meant to look like this from the factory.
Credit goes to the Haynes Xtreme Customizing Manual for the pictures.


Monday, February 15, 2016

Horsepower & Torque

The two most misunderstood measures of an engines power is horsepower and torque. So let's just clear it up.Torque is your engines actual power,horsepower is how fast you get it. Make any sense? Torque is the twisting force or energy placed on the crankshaft and horsepower places a time factor on how fast it makes that power.Most people read up on horsepower that a particular performance engine produces and they in turn want that kind of power.Now remember,torque is what you feel when you put the hammer down when the traffic light goes green.Making modifications that help produce low end torque is what you want for the street.Face it,if you've got any sense at all (and we KNOW you do) your engine is not going to ever see 6000 rpm on the street.

There are a number of things you can do to increase your engines low end torque and still maintain drivability.All of us (yes,even the guys that don't think they want it!) want more power when we hit the gas. Let's keep in mind that the average 500 horsepower engine is not going to idle very well in traffic and will rarely see 22 mpg! Unless of course it's either supercharged or has a turbo installed. 100,000 miles between tune ups are a thing of the past when you consider anything more than trying to gain the free horsepower that your engine already has.
Lets think about headers,cat-back exhaust systems and cold air intake systems for a minute. Headers help to balance compression,scavenge exhaust gasses and the engine breathe better. All a plus when thinking about performance and efficiency. Cat-back systems are just that,exhaust systems that are bolted or welded on after the catalytic converter. Almost all cat-back systems reduce back pressure by seriously reducing those tight wrinkle bends in your restrictive factory system helping your engine breathe better.Headers and a decent cat-back system can help you gain very noticeable power. More so if there are other performance mods already in place.You might want to invest in a decent set of aftermarket cats too!

Now cold air intakes are something relatively new to the bolt on performance scene.The performance gain comes from the engine getting a smoother,straighter flow of air into the intake manifold. Now when you introduce fresh "cold" air into the equation then the performance value comes in.The colder the air you have coming into the manifold,the denser the air/fuel charge and the more air/fuel you are going to get into your engine.The air intake system will basically give you better efficiency due to the straighter,smoother air coming in but,chances are it will be a colder denser charge that adds to performance so you may not see much of a fuel economy increase but,you may see a power increase or you could get both,I've seen and heard of both.
There are various other mods you could do like chip up grades,having your car or trucks computer parameters re-vamped or power programmers.It depends on your budget.If your Canadian like me,then a lot of us either get performance parts and upgrades to our vehicles or presents for the kids at christmas. With the products and parts that are available today,you could actually save yourself a little cash at the pump with some modifications because they increase your engines efficiency,that of course would depend on how you drive.

Now,one could argue that is these things are modifications work so well ,why doesn't the vehicle come out of the factory like that? Well simple,from my point of view cars and trucks are built on an assembly line and it's easier and cheaper for the factory to do what they do. They also do it the way the do to keep things quiet,now for anyone that loves and respects that throaty rumble it's not what we are looking for. However,the factory does builder your engine with durability and efficiency in mind. And the majority of consumer want their vehicle to be quiet and smooth.

Friday, February 12, 2016

Adding a little Safety to your garage.

If you`re anything like me,it may have taking you a while to add a little safety to your garage,
I always thought that I was being pretty smart when I worked on my vehicles,looking back though..maybe not so much.
I`ve gotten Anti-freeze in my eyes, accidently started a fire using an electric fuel pump, dropped a couple heavy objects due to using the wrong type of chains...well you get the picture. so here`s a few things to think about prior to starting any kind of work on a vehicle or pretty much doing anything in the garage for that matter.

  1.  Don't count on a jack,always use jack stands that are rated for the weight of the vehicle.
  2. If you're loosening really tight lug nut,get them cracked before jacking the vehicle up.
  3. Properly block your vehicle from rolling when lifting one end or the other.
  4. Don't be taking of the rad cap when the engine is hot. Same goes for draining oil,even though they never let the engine cool down when you go into a Minute Lube,that doesn't mean its safe to do.
  5. When your working on your brakes,stay well away from the cancer causing agents that make up part of your brake pad and shoe linings. This goes for clutch discs too! Here's a hint of one of the products,Asbestos!
  6. When using a wrench,always try to pull towards you. Unless it is open enough on the opposite side to push the tool without you scraping or cutting your knuckles.
  7. Use the right tool for the job.
  8. Use proper drain pans that will hold as much fluid as you need them too when you are draining them.
  9. Use safety glasses and hearing protection. Take it from a guy that's half deaf and had to flush his eyes out lots of times and has a hard time hearing what the wife is sayin.
  10. Label everything! Even if you are they only one that works in your shop. You never know when your kid is going to think that old anit-freeze tastes like liqourice.
  11. If you have young children, make sure your paints and cleaners are in a cabinet they can't get into.
  12. Keep a bottle of peroxide in your shops first aid kit in case your family dog had a taste of that anti-freeze in the drain pan on the floor.( Small dog= 1 table spoon,medium and larger breeds 2 table spoons) Let them puke it out and then call a vet. (Don't do this with your kids call the hospital!)
  13. Get a buddy to help lift that 5 speed transmission onto the bench,or anything else that weighs more than you do. Once back issues start,they have a habit of coming with a lifetime guarantee! 
  14. We all know you`re smart enough to not have loose clothing on when it can get caught up in anything that spins fast..electirc fans,fan belts,alternators..and so forth.
  15. Never ever rush a job! Take the time to do whatever it is that you are doing right. The safe operation of your vehicle is priority number 1,if your vehicle is un-safe as a result of your work it effects everyone on the road with you. That includes the safety of your family.

Steering,Brakes and Your Front End.

 If you have never worked on any of these systems of your vehicle then find out all you can about them. Rule number one for me,the second thing I buy after I`ve bought a vehicle is to go down to the local parts store and buy the manual they sell for it. Having fasteners left over after you`ve installed new brake pads would tell you there`s something wrong. If you need one,click here. You may have to search a bit but,its well worth it.

Airbags

 These safety features on your vehicle are in essence explosive actuated devices. Make sure you`ve gotten all the info you need to properly dis-able your vehicles airbags while you are working on them,one of the reason`s why they recommend that you remove the negative battery cable from your battery prior to working on your vehicle is to prevent the airbag from punching you in the face at the wrong time.

Asbestos

Contrary to what most people think (and I say think cause the majority doesn`t know any better) every vehicle on the road has cancer causing asbestos integrated into various parts on a vehicle,disc and drum brakes, clutches just to name a few. Use a mask when working on these parts and avoid the dust!

Fire Prevention

Remember that I mentioned fire before? Well let me tell you, a gasoline fed fire spreads very fast! I blew through 2 30 pound fire extinguishers putting out a fire I started by not using my head. At the very least one Dry Chemical fire extinguisher at each entryway into the garage or one very handy if you are in the driveway.
Remember, any device that uses radio frequencies,cell phones,2 way radios and the like, create static electricity and can cause a fire under the right conditions. If you have gas in a container with no lid on it then vapors are present. I watched a guy set fire to his work truck on morning when he was talking on his phone. There's a reason that sign means "NO Cell Phones". Anything that can cause a spark can start a fire if there's vapors present.

Fumes

There's a reason that cleaning product come with what's called an MSDS or Materials Safety Data Sheet. These wonders of modern technology tell us some very important information when it comes to proper use. Reactions, LEL (lower explosive limit), UEL (upper explosive limit) and proper handling techniques just to name a few. These products sometimes create toxic fumes. Make sure you wear the proper masks and have ventilation when required when you use these products.

If you use a little due diligence your project will turn out exactly how it was supposed to and you'll get to live to tell about it. I've seen natural selection come into play through out the years and its never pretty. At the very least,make sure your first aid kit is up to date and is adequately stocked.


GM & Chevy Truck History Lesson


Chevy Truck Origins

If you were lucky enough to be around in 1918 you could have picked up the very first Chevy truck that rolled off the line. If not,then here's a bit of a Chevy truck history lesson. The very first truck featured 22 horsepower.The truck was nothing special with no cab and a sticker price of $600.00.The truck came without a cab but,either the cab or the bed could have been installed by an aftermarket company,which is what a lot of people did. This was also the same year that Chevrolet was to become a part of GM.

Up until 1928 GM was mostly building commercial trucks,then they decided to change that and brought out the new T-11 pick-up.Based on the Pontiac truck with 36 horsepower,this truck was to be the first in a long line of great pick-ups from Chevy that many,many people would base their build ups on.Or just have a truck that would haul what they needed around the farm.


Beautiful Chevy show truck


The new advanced 6 cylinder OHV engine was build and introduced in 1929.This engine was considered powerful for it's time and was actually very efficient given the technology available during the time.

Major and minor technological advances through out the 30's and 40's saw horsepower gains,more comfort,bigger trucks.Then came 1955,Gm and Chevrolet started taking ideas from their cars.The styling started to take on a look that really started to make the GM and Chevy trucks stand out.Power options from the reliable 6-cylinder to the newly available V-8 that featured 154 to a 155 horsepower.The Chevy used the stout Small Block for their trucks while GM used the slightly larger Pontiac V-8 until 1960.The Small Block Chevy made such a good platform that it soldiered on the power most of the GM vehicles until 1998.

1957 saw the new 4 wheel drive introduced and the Chevy truck was the most popular truck in the U.S. Although GMC trucks were every bit as good.In 1960 Both GM and Chevy trucks were produced with a major face lift that included the new "pinched" look running the length of the truck.

Now,bare in mind that history being what it is,there is some conflicting versions about engine use and production through out the long celebrated history of the Chevy truck.The 283 was a great little engine that was pretty much bullet proof.The 327 featured almost the perfect rod/stroke ratio for and acceleration engine was available in the Chevy truck in 1966 with 220 horsepower.

A couple of things to remember,the "C" designation means two wheel drive. The "K" designation is for the four wheel drives. The Number 10,for half ton trucks,20 three quarter ton and 30 for 1 ton trucks.Today the numbers 1500,2500 and 3500 are used.

My favorite Chevy truck was built from 1967 -72. As far as I'm concerned these were the best looking Chevy truck made. The 1988-1998 style is a close second. The styling of the 67-72 trucks were a complete change from previous years and is the starting point of many build ups today. I'm not going to go into the available engines and when they came out due to the many different versions of the truth about what was put into what.

Engine displacement and horsepower ranged from the 175 horsepower 283 to the 255 horsepower 327.the 195 horsepower 307 was also used for a couple years but, was not reliable enough to be considered a good build-up starting point. The 310 horsepower 396 was also and option in 1970. However, the was also the odd truck with the 283 horsepower 283,375 horsepower 327 which by the way would beat a 375 horsepower 396 due to the weight factor and then the 375 horsepower 396.1967 marked the last year of production for the 283.1969 was the last year for the 327.These engines were still installed from the factory until 1970 for the 283 and 1972 for the 327 because of left over complete assemblies.In 1970,the 396 was replaced by the small block 400.Although this engine came out with 250 horsepower,it made a lot of torque.

In 1973 horsepower ratings were down across the board because of the new "SAE Net" rating system and lower compression ratios.And we all know that people sometimes have a heavy foot and like to use the power they have under the hood. Building pressure from insurance companies also had a major part in the horsepower going down.

The Small Block Chevy was set at 305 and 350 C.I.D. and the Big Block was set at 454 C.I.D for the next twenty years. The 250 and 292-6 cylinder was still available but,were completely replaced by the 4.3 liter V-6 in 1988,which is basically a small block Chevy with the front two cylinders cut off.

GM introduced a 5.7 liter diesel based on the Oldsmobile engine in 1978 and replaced it with the 6.2 liter in 1981 that provided more power and better fuel economy.

1998

In 1998 Chevy and GMC came out with a new generation of trucks. Better power and fuel economy combined with great styling that in my mind reminded my of the 67-72 model years.Electronic fuel injection and 700R 4 speed automatic transmissions greatly helped the efficiency of these trucks.Although,the 5-speed stick shift was the best combination for fuel economy.A powerful new diesel was introduced in 1992,this became one of the most powerful engines for towing and hauling to date.In 1996 was saw the Vortec put into the trucks with sequential fuel injection in the small blocks and multi-port on the 454. However,I will always be a fan of the first EFI installed on the Chevy's in 1987.

In 1999 we saw the introduction of the 4.8,5.3, and 6.0 liter engines the were a marvel of engineering and efficiency. The 5.3 liter actually displaces 323 cubic inches and not 327. A flatted torque curve and higher horsepower made these engines great for reliability.The 8.1 liter turbo diesel came along in 2001 with 300 horsepower and 500 lb/ft of torque causing some people to start towing and hauling work that used to require a bigger truck.

Now don't for a minute think that GM and Chevy have not continued their refinement of their line up of trucks.With the economic crunch and demands for better fuel economy.they have their work cut out for them but,if history is any indicator they will come out on top of the pack just like they have so many times in the past.The GMC and Chevrolet trucks have consistently have the highest re-sale value,most economical and most dependable trucks on the road for at least the last 30 years that I can remember. And they are built right here in North America!
We're not sure whom to credit for this info and therefore we are just sharing it with the general public.

305 Engine Myths

305 Chevy Small Block

I have owned a few 305 engines and I have a little knowledge when it comes to them. Debuting in 1976 the 305 was to be the small block that carried Chevy into the eighties. With more and more constraints placed on the automotive industry to meet government mandated EPA standards an engine had to be produced that would be the replacement for the 350 CID. With a smaller bore and less aggressive cam profile these engines were basically designed to just get the job done. The 305 has a 3.48" stroke and a bore of 3.75",not 3.87" that the 283 has as some will tell you. The smaller bore restricts the size of the intake valve that can be installed on that engine. The 305 also has a dished piston.
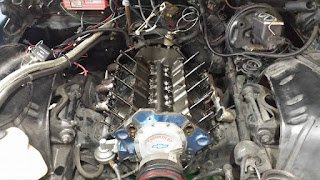
  I was looking at a third Gen Firebird to build and I came across one sitting in a yard just off the hi-way one day. I went into the yard and found the owner and started talking to him about the car and had a good look at it. The interior was completely shot and it would need a little body work. After talking with the owner and finding out that the car had a "high performance 305" I was a little taken back. Now,I'm going to be honest with you. No matter what you do with a naturally aspirated 305,you will never see more than 325 horsepower out of a 305 that is naturally aspirated and that is with a lot of work done to it. The cylinder walls do not have enough metal in them to make boring them worth the time. The block just wasn't designed with that in mind. Remember that the engine itself was designed to meet emissions standards. Anyway,the price that I offered for the car was about 2000 less than what the owner wanted for it. I offered to take the engine out and return it to the gentleman as further talk revealed that it had been driven about 150 miles after the motor was rebuilt and then parked and had not been fired it 10 years. The owner insisted that everything was fine and that the engine was "top notch". It became painfully clear that this was going to be something I would have to pass up and I did.


   Now,one of the things you can do with a 305 is install a bigger cam than you could into a stock 350. The reason for this is the dished pistons. You will however need to install valve springs that can handle the increase in valve lift,yes I'm talking from experience here. Taking into consideration that engine have the highest vacuum at idle says that the velocity of the air charge going into the chamber is very good at the low end. You get better velocity flowing 200 cfm of air through 180 cc runners then if you had 210 cfm of air going through 200 cc intake runners. With that said,you can create some good low end power with a 305 and a decent camshaft. A good set of headers and exhaust system coupled with a good after market intake manifold and carb set up also helps. Basically all the things you would already do with 350 Chevy aside from installing 2.02"  heads. The largest valve you can install on a 305 is 1.84" without hitting the cylinder walls. If you want the most you can get,hogging out the exhaust runners will also help. As I said before,the most power you can reasonably expect is around 310 - 325 horsepower.

Forced Induction

  If you plan on any type of forced induction,then a Turbo would be the way I would go. The reason for this is simple,given the limited valve size it makes sense. You would be creating more low end velocity through the intake runners. A supercharger will of course increase horsepower but,it would also increase the thrust load on the bottom end bearings more than a Turbo charger. It just wouldn't be as efficient as a turbo. Remember if you do plan on rebuilding a 305 it might be an idea to balance the internals and think about a complete roller valve train. It's just freeing up a little more horsepower. There are also a lot of guys out there that can do some amazing stuff with a set of heads so it would pay to do your research.


  The research and development that went into the 305 lead to some serious improvements to the technology that went into the small block chevy. Making a lot of the horsepower improvements implemented into the 350 in the 80's and the return of big horsepower. In 1991 the TPI 305 was for all intents and purposes just a fast as the TPI 350.

Tuesday, February 09, 2016

The C-10 Pick-ups

More and more I find myself thinking about building a C-10 Pick Up. I've owned a few over the years and looking back I could kick myself for letting them go. There's a lot of truth to "You don't know whatcha got till it's gone".
A good friend of mine bought a 1970 4x4 Pick Up about the same time I bought my Camaro. I have to admit,he got a fantastic deal on this truck. He's my expert on this style of pick up.
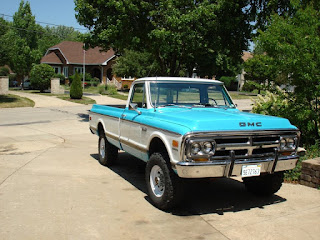
1970 GMC 4x4

I first fell in love with this style of Chevy when I was 16 years old. A lady pulled into the gas station I was working at and I just started drooling. After asking if I could check it out and get a real good look at it I was hooked. It would be a couple years till I actually owned one for myself though. I remember putting a steering wheel from a 76 Trans Am in it. Buck seats. I put a 350 from a fire damaged 70 Chevy short box in the truck and as far as I was concerned I was good to go!
Lowered 67 GMC Pick Up
This 67 is a pic I came across somewhere out there on the net. I love the lowered look and the 20 inch wheels. While some may say this look takes all the class out of this Chevy, I appreciate the time and effort people put into building any hot rod project.
Here's the same style of pick up without being lowered. They both look great. You can't deny that the old C-10's are one of the best trucks that came off the assembly line. I've even seen a 69 Chevy 4x4 with a box from a 89 Chevy Step side on it and it looked like that's how it rolled out the assembly plants doors. 


Monday, February 08, 2016

The New 350 in the Camaro

A little while ago I decided to have a serious look at the motor in my 1980 Camaro. I had tried to work a few of the bugs out of it with no luck. You see,I bought this car from a friend of mine from my old home town. I took him at his word that things were built properly. Big mistake on my part but,that story's for another time.

  After swapping the 750 Edelbrock Performer for a 650 of the same make and a little tuning the car sounded pretty good,just have a listen to the video.
 

 Thing is,when I took it out on the street,it was a dog. My 96 Chevy Pick Up could lay waste to it. And now matter what I did I always had a bit of an erratic idle quality. I only had 4-5 inches of vacuum  showing on the gauge so I got to thinking that there may have been a mistake when the cam timing was set up. There was a gear drive timing gear set up installed. Or maybe that the valve lash wasn't adjusted properly. I had guide plates and screw in studs so I knew I was going to have problem setting my valve lash with the intake manifold in place. So I decided to have a serious look at the internals. So a buddy and I started to pull a few things apart. That's when I knew there was problems with this engine.

Old 350 in the Camaro
Old 350 short block

Note the Harmonic balancer, looks a lot like it was hammered on, never a good thing to see! Generally when that's happened you end up with more crankshaft end play then you want. The screw in studs were nice to see however, the finger tight nuts gave me further cause for concern. When I got to this point, I was still hoping to be able to salvage the engine and not have to remove the short block. Then I noticed that the block had 6 matching piston bosses. The last two were from a different set of pistons. The cylinder heads were ported out to the point that the porting had cut into the hold down screw holes for the valve covers.
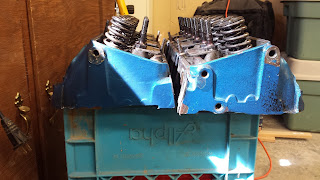
Casting number 3991492 SBC Heads
These heads were a 3991492 casting number. And yes, they were angle plug small chamber Camel back heads. The porting job completely ruined some of the best factory heads that ever came out the back door of the Racing Shop in Detroit.

  I had and engine from my daughter's S-15 that would serve until I could find a suitable replacement for the long run. I also had a set of aluminum Vortec cylinder heads that would do a fine job in the Camaro. So I set to pulling the old heads off the replacement 350. I was in for a suprise. Stamped right on the top of the flat top forged pistons the resting inside the cylinder of my daughter's engine was .020. Meaning that the engine had been bored out. The cross hatch in the cylinders was still excellent. I pulled the pan off the bottom of the motor to find forged rods. When I pulled the heads off I also noted that there was no carbon build up at all. And the motor did run very strong in my daughter's truck.

  So after a gasket kit,installing the Vortec heads,adjusting the valve lash prior to a new Edelbrock intake the motor was ready to go in. The heads are 2.02 Patriot Aluminum Vortec's with 188 CC runners. The did have both old school and the new Vortec intake bolt patterns however, I installed a proper Edelbrock Aluminum intake manifold because I had sealing issues with the old style bolt pattern with these cylinder heads.
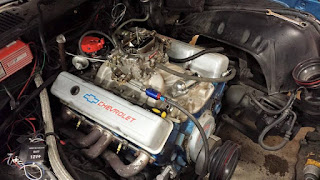
New 350 Chevy
The new 350 looks really good inside that Camaro!

After bolting the carb, water pump and the rest of the accessories up the small block was ready to fire up.
Here's what it sounds like,
 

All in all a good result and I'm very happy with it.


Chevy Truck Hubs

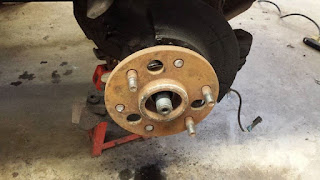
I've had my share of problems with trucks,generally not with my Chevy's front hubs. I was on my way home with a stop in town before hitting the house. It had been a fairly long day and I was looking forward to relaxing. As I turned at the intersection that lead from the highway to the small town I lived outside of I noticed my front end start a hell of a wobble! Thinking back I wish I had gotten a picture of what it looked like on the side of the highway. For now though, a pic of what it looked like after I got the wheel off will have to do for ya.

My work truck's broken wheel studs

After stopping at the first approach I came to, I pulled the cape off the rim to discover that I had three broken wheel studs. So,first thing I did was jack up the truck, then I grabbed my cordless impact and tightened what was left of my nuts. Now my hands were getting a little cold because it was Febuary and the temp was dropping quick cause the sun had just gone down. Knowing now that my plan for the night had changed I stopped at the push and pull store and grabbed a 6 and headed for home.

   Once home I pulled the truck into the shop and pulled out the brand new hubs I had gotten with the truck a couple years ago when I bought it. Finding them in perfect shape after inspection I started pulling wheels off the front of my work truck. Once on jack stands with the wheels off I noticed why the holes are in the plate where the studs are pressed into, they give access to the bolts that hold the hub assembly onto the front axle. The general assembly is pretty much the same across the board with most of the American built trucks. And to be honest,to this day Chevy Truck parts are the cheapest in the aftermarket. and they are the easiest to work on. after disconnecting the speed sensor plug, removing the bolts that bolt to the axle housing and removing the big wheel nut in the center my hub was ready to come off. Now here's where I always wonder if it would pull of nice of be a serious investment of my time. I was lucky enough to be able to wrestle both front hubs off with no problems. Now,straight up when you change one hub then change the other. Unless there is absolutely no other option. New parts operate like new parts,using one old and one new when there's more then one is generally asking for problems. For example..wiper blades,tires, spark plugs, front wheel hubs...well you get the picture.

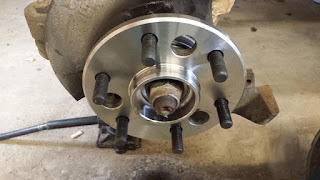
  So after about an hour I had both the old hubs off and one new one installed, and this is what it looked like.
Work trucks new hubs

Everything looks nice and shiny right out of the box. Installation does require Axle grease along the spindle shaft and for good measure pack along any bearing surface as well. These new hubs had sealed bearings pressed into them so I greased what ever surface I felt needed grease. I didn't tighten the retaining bolts to what they where at, I torqued them to 90 lbs with some lock-tight on the threads and snugged the spindle nut (the big nut the holds the hub to the spindle shaft) to 12 inch pounds. Now, here's how you do that. first you snug the nut up till the hub bearing seats onto the spindle,then you back it off and snug it up again till there's a little drag. This is how I was taught how to do it and I haven't had any problems as a result. However there may be many different way to make this happen. After about two hours total time in the garage,I had the truck back together and ready for work the next morning. Of course a buddy stopped by and laughed at me tellin me better me then him and yada yada..lol.

Wednesday, February 03, 2016

Old school pick up trucks

Anyone out there drive a regular cab 2 wheel drive pick up? You know,the one that you gotta put weight in when it comes to winter time driving? Even 4 wheel drive trucks need some weight in them to help winter driving out. It doesn't matter what kind of tires you have, weight in the ass end of that truck is your friend! Even the most technologically advanced tire is gonna send your butt sliding in the snow where a little weight is all you need to get traction. One more thing to add when it comes to old school pick up trucks, the long boxes were better in the snow and ice because was more weight going towards the read end of the truck. There was more then a few accidents simply because people weren't used to driving a short box pick up.

JWT Automotive Chevy 4x4
 A really good idea,building something to hold your sand bags in place. I also recommend transferring sand into a container that you can use year after year. No point in buying sand bags every year right?
sand bag box

 I'm about to upset a few people...well maybe some might just get pissed right off. I have to ask this question tho..what the hell happened to teaching the next generation about tips and trick of driving in the winter? It should be law that we get to take our kids into an empty parking lot right after it snows just to show them how everything can go to hell in a hand basket real quick.
Most of us did just that when we were kids. Couldn't wait for the first snow fall to hit the arena parking lot..or where ever worked. Now if some kid got caught doin that then there just has to be "something wrong with that kid". The lessons learned in those empty lots will stay with that new driver for the rest of their lives.

  My daughter had her first "oops" a couple weeks ago. Cost me a couple grand but, no one got hurt. She was driving into a driveway to turn around and while she was backing up she hit the brakes and then the truck slid into an import that seemed to be made entirely of nuclear powered plastic..or at least the plant that the plastic was made at must have been nuclear power cause it was expensive! I had my daughter driving the truck last winter as much as possible. There was even weight in the truck, just not enough. My point is, you should be teaching your kids to pay attention to what you are doing behind the wheel as soon as they can comprehend what`s going on. In this day and age of technology,phones,DVD players...yada,yada,yada...we`re creating a generation of kids that aren`t gonna have a clue about the practicle application of life. Sure they`ll be able to run a phone and a computer but,if they ever have to change their own tire...they`re probably gonna be screwed.

Saturday, January 30, 2016

Wow, that long eh?

I looked at my blog and thought to myself its been a long time since my last post. Initially, I was writing this blog to share a few of my automotive adventures and have a few laughs. Since my last post I've moved three times, had a house burn down at the ranch and even had a little surgery along the way.

 A few of the things people had mentioned to me about moving that gave ma a bit of a chuckle. My car was a topic as well as my boat. People asked me why I would I want to drag them from place to place? In my own mind I was glad that I wasn't dating the one woman that posed questions like this to me simply because I would have laughed and suggested that she move on. So as I sit here in front of this screen and recovering from surgery I think about how it never bothered me to have to clean out my garage or to haul a Camaro, Firebird, an S-10 project, my boat, dirt bike and all my tools and parts around. I'm a gearhead so moving and hauling those things around are part of the deal. It may cost me money and time but, I bought the car because I wanted it, I bought the boat because I like my time on the water, I bought my dirt bike because I love to grip it and rip it. The Firebird was given to my daughter by her grandfather and the S-10 project was paid for by my daughter because she wanted to build a truck. which by the way has been completed and sold.

Asking for Trouble.

 So asking a gearhead why he hauls things around that he still wants at the time or telling him that he is wasting his time and money doing just that isn't good for you,it's just asking for trouble. He's going to haul them around anyways regardless of what anyone says. You would be far better off supporting said gearhead as they would be more willing to support you when it comes time for the things he or she thinks are a waste of time. I my mind its hard to justify a decorative soap bar holder because I'd look like a retard trying to shove it in my gas tank.
get my drift? And if you're moving in with someone that doesn't have a garage to park your project in or space to work on it then you're in for a rough go. Take it from me, one of my moves was to a small town in Alberta and while I could park my car in the garage,I wasn't "allowed" to work on it there. A small leak developed from a tranny cooler line and I never heard the end of it. We broke up because I found a garage to rent for a shop. Nice eh? Needless to say, hot rodding is in the blood, same as jumping on your dirt bike...well you know where this is going.

Until next time.